Today is the first day that I posted a project over at the
Sweet N Sassy Stamps blog. I am so excited about being their Guest Designer and I think you guys will be thrilled to see more of their stamps being shown on my blog too! If you want to take a quick peek at my first post, just visit the
SNSS blog HERE! I will be posting over there on Mondays, Tuesdays and Wednesdays but I will still be posting here as well! Be sure to visit on the other days of the week though too because you won't want to miss Betty Wright's posts... that girl has some real talent!!
Now, onto what I have made for SNSS today!

And this is the card that I made...

You might remember me telling you about how my daughter Leah enjoys raising squirrels. In fact, she is in the process of raising one right now that she will be releasing into the wild soon. I even made her a
mini album as a tribute to the first squirrel that she ever raised. (To see the album click on the mini album link above and then "next" in the upper right hand corner to see the rest of the pages.) So, of course, I am like the "Granny" to these little creatures when she comes home from school for the weekend, and subsequently I have grown very fond of squirrels too!
Squirrels make me smile!! :-)

When
Sandy (the DT coordinator for SNSS) sent me this digistamp to use this month, I thought I would flip!! I had been eyeing it all along in the store and it was like an answered prayer that she actually sent it to me!! I love this little guy. He is called
Sunny Squirrel and can be purchased at the SNSS store.

The Sunny Squirrel set comes with three sentiments designed to encourage others and they are sure to bring a smile to the recipient's face! The DP's I used for this project come from The Greeting Farm paper pack called Sunny Glen. I also used some Bazzill Kraft paper. I colored the image using my Copic markers. Machine stitching was added around the main panel and the sentiment panel. The grosgrain ribbon was purchased on Ebay in a collection of SU colors. The brads are from Basic Grey.

I have a tip that I want to share with you concerning how I made this card.
Did you notice that the sunflower portion of the main image extends beyond the base that was cut with a nestie? This is not something original that I created, but it is a really cool effect that I am sure you have seen elsewhere. My friend Vianna recently shared with me a link showing how to do this trick and I wanted to share it with you, but unfortunately, I can't find it right now! I will try and find it so I can give her the credit, but in the meantime I have created a tutorial for you!
Tutorial: Extending a Cut Beyond the Borders of a Nestie
For starters, print your image onto your cardstock. Do not color it yet since you want to make sure the cutting comes out perfectly before you spend the time coloring it.
 Choose the Nestie that you are going to use and place it die side down over the image. Center it as you choose leaving a portion of your stamped image extending beyond the edges of the Nestie. Mark your corners for ease of replacing the die later.

This is what it will look like when you remove the Nestie revealing the reference marks in the corners. Keep in mind that these marks aren't the cutting lines. The cutting lines are a little further in.

With a pencil, make a mark where you believe the Nestie will cut. I have made a pencil mark denoting this. The red lines indicate where you will be cutting next to the image.
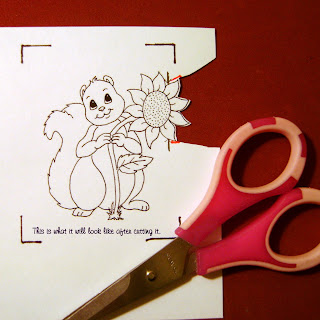 Cut away at the red marks and up to and then slightly beyond the pencil marks you made. You must cut beyond the marks so that the Nestie can fit back into this slot.

Replace your Nestie with the die side DOWN. Position it so that it lines up with your corner reference marks. Be sure that the piece you just cut away is ON TOP of the Nestie so it won't get cut when you run it through the die cut machine. Tape it to keep it securely in place.
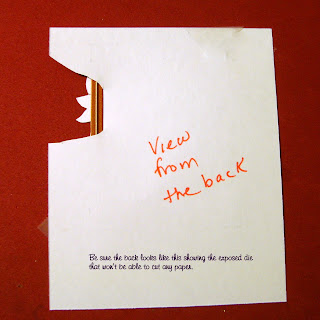
This is what the back view looks like if you have placed the Nestie properly. The exposed die means that it won't be cutting any paper at the point.
 Run the image and Nestie through your die cutting machine. Emboss it also if desired.
 This is the finished product ready for coloring!! Easy peezy! Now how about you try it!
Welcome to any of the new SNSS bloggers that have visited my blog today. I hope that you will become a Follower of this blog too and be back for more SNSS projects for the month of October!
My World Card Making Day cards and ornament were posted late last night so if you want to take a look at them scroll down to the previous post!! I hope you had a fun celebration for WCMD! Did you get lots of cards made this weekend??
I hope you have a great Monday and may your bucket overflow with things that make you smile!


 When I knew I was going to use the scarecrow image from the Happy Harvest stamp set sometime during this month as SNSS GD, and I saw this DP, I knew I had to incorporate it into the design. I felt like the DP compliments the feel that I was going for on this card. The DP is from K & Co. I paper pieced the scarecrow's face, shirt and the patches on his overalls. The rest of the images were colored with my Copic markers.
 To create the feel of a farm, I simply used the masking technique and created the scene that you see here. I stamped the scarecrow on the image panel and again on a piece of scratch paper. I placed the scratch paper over the stamped image and then created the cornfield by repeatedly stamping the cornstalks to make the scarecrow to appear that he is in the middle of a cornfield. I colored the ground to look like dirt.
 Raffia is another accent that can be used to add to projects that are rustic, or country-like. I added the orange button and the orange ribbon to add flair and whimsy to the otherwise muted colors on the card!
 To continue on with the rugged feel, I also added staples to attach my image panel to the card base.
 And here is what I came up with! It took a little finagling to get the multiple prints to work well with each other. But after some creative rearranging I was pleased enough with how it turned out. I like how the light blue and red contrast with the each other and the white so well! The DP is from the Shabby Princess. The blue and red CS is from the Paper Co.
 In addition to the adorable SNSS mouse image, I also used a a new sentiment stamp (


 Because Jen's digistamps contain only words and sentiments, we had the liberty of using any other image stamps that we chose to. The stamp set that I used to create this scene is from Sweet N Sassy Stamps'


 Here is a view of the inside of the card! I still had some scraps left, so why not decorate the inside too!


 It is time once again to show us what you have created with the latest issue of SheetLoad of Cards;
 The ribbon comes from the Dollar Spot at Target and the Lace is from JoAnn's. I used my Martha Stewart border punch and my oval nestie too. I added machine stitching because I felt it went well with the Shabby Chic look I was going for with this card.


 Here is a closeup of the stamped images. I printed them out onto 110lb Georgia Pacific CS and then colored them in with my Copics.





 Posts
Posts